SSM集成
1. Spring和各个框架的整合
Spring目前是JavaWeb开发中最终的框架,提供一站式服务,可以其他各个框架整合集成
Spring整合方案
1.1. SSH
Ssh是早期的一种整合方案
Struts2 : Web层框架
Spring : 容器框架
Hibernate : 持久层框架
2. SSM
主流的项目架构的三大框架(相对其他框架而言,最优秀)
SpringMVC : spring自己家的 Web层框架,spring的一个模块
Spring :容器框架
MyBatis :持久层框架
3. Spring与MyBatis整合
3.1. 集成思路
实际开发,使用Maven项目,直接引入项项目在Maven仓库中的坐标即可
学习阶段: 手动导入jar包,从零开始集成(巩固基础知识)
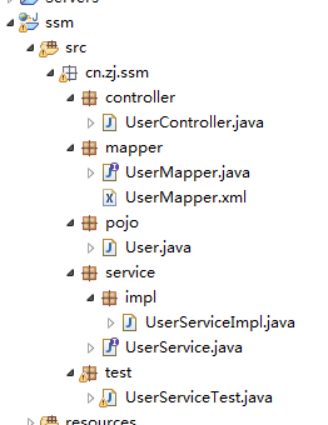
3.2. 创建java项目
|
|
3.3. 准备集成相关jar包
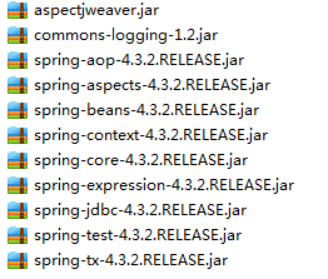
3.3.1. Spring依赖包
|
|
3.3.2. SpringMVC依赖包
|
|
3.3.3. Mybatis依赖包
|
|
3.3.4. MyBatis和Spring框架集成的桥梁包
Spring自己并没有集成MyBatis框架,需要MyBatis自己来集成,所以需要自己提供Spring框架集成的桥梁包
如果我们使用的mybatis3.4.4 不能直接使用mybatis内置的 桥梁包版本,版本比较低,无法正常运行,需要单独下载一个比价高的版本
|
|
3.3.5. 数据库驱动包和连接池
|
|
|
|
3.3.6. Jstl标签库依赖包
|
|
3.3.7. Mybatis支持的日志包log4j
|
|
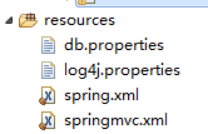
3.4. 项目集成需要各种配置文件
|
|
3.5. Mapper层
1 package cn.zj.ssm.mapper; 2 3 4 5 import java.util.List; 6 7 8 9 import cn.zj.ssm.pojo.User;10 11 12 13 public interface UserMapper {14 15 16 17 int insert(User user);18 19 20 21 User selectByPrimaryKey(Integer id);22 23 24 25 26 27 List selectList();28 29 30 31 int delteByPrimaryKey(Integer id);32 33 } 3.5.1. Mapperxml文件
insert into user (name,password,age)values(#{name},#{password},#{age}) delete from user where id = #{id}
3.6. 完成项目层与层之间spring对象的创建和依赖关系的维护
3.6.1. Service层
1 package cn.zj.ssm.service.impl; 2 3 4 5 import java.util.List; 6 7 8 9 import org.springframework.beans.factory.annotation.Autowired; 10 11 import org.springframework.stereotype.Service; 12 13 14 15 import cn.zj.ssm.mapper.UserMapper; 16 17 import cn.zj.ssm.pojo.User; 18 19 import cn.zj.ssm.service.UserService; 20 21 22 23 @Service 24 25 public class UserServiceImpl implements UserService { 26 27 /* 28 29 * 问题: UserMapper 代理对象如何创建? 30 31 * 答 :使用 SqlSession 操作对象创建 ! 32 33 * 34 35 * 问题 : SqlSession 对象如何创建? 36 37 * 38 39 * 答 : SqlSessionFactory 工厂对象创建? 40 41 * 42 43 * 问题: SqlSessionFactory 对象如何创建 44 45 * 46 47 * 1,和Spring框架集成之前 48 49 * MyBatis框架自己读取配置文件中的相关配置去创建 50 51 * 2, 和Spring框架集成之后 52 53 * 交个Spring容器来创建 54 55 * 问题: 如何在Spring框架中配置,创建出来SqlSessionFactory对象? 56 57 * mybatis和spring集成的类查阅 桥梁包 58 59 * org.mybatis.spring.SqlSessionFactoryBean 创建 SqlSessionFactory 60 61 * 62 63 */ 64 65 @Autowired 66 67 private UserMapper mapper; 68 69 70 71 @Override 72 73 public int insert(User user) { 74 75 return mapper.insert(user); 76 77 } 78 79 80 81 @Override 82 83 public User selectByPrimaryKey(Integer id) { 84 85 System.out.println(mapper); 86 87 return mapper.selectByPrimaryKey(id); 88 89 } 90 91 92 93 @Override 94 95 public List selectList() { 96 97 return mapper.selectList(); 98 99 }100 101 102 103 @Override104 105 public int delteByPrimaryKey(Integer id) {106 107 return mapper.delteByPrimaryKey(id);108 109 }110 111 112 113 114 115 116 117 }118 119
|
|
3.6.2. 测试代码
1 package cn.zj.ssm.test; 2 3 4 5 import java.util.List; 6 7 8 9 import org.junit.Test;10 11 import org.junit.runner.RunWith;12 13 import org.springframework.beans.factory.annotation.Autowired;14 15 import org.springframework.test.context.ContextConfiguration;16 17 import org.springframework.test.context.junit4.SpringJUnit4ClassRunner;18 19 20 21 import cn.zj.ssm.pojo.User;22 23 import cn.zj.ssm.service.UserService;24 25 26 27 @RunWith(SpringJUnit4ClassRunner.class)28 29 @ContextConfiguration("classpath:spring.xml")30 31 public class UserServiceTest {32 33 34 35 @Autowired36 37 private UserService service;38 39 40 41 @Test42 43 public void testInsert() {44 45 User user = new User(null, "乔峰", "qiaofeng", 30);46 47 int row = service.insert(user);48 49 System.out.println(row);50 51 52 53 }54 55 56 57 @Test58 59 public void testSelectByPrimaryKey() {60 61 User user = service.selectByPrimaryKey(8);62 63 System.out.println(user);64 65 }66 67 68 69 @Test70 71 public void testSelectList() throws Exception {72 73 List users = service.selectList();74 75 76 77 for (User user : users) {78 79 System.out.println(user);80 81 }82 83 }84 85 86 87 }
3.6.3. applicationContext配置文件的配置
| <?xml version="1.0" encoding="UTF-8"?> <beans xmlns="http://www.springframework.org/schema/beans" xmlns:p="http://www.springframework.org/schema/p" xmlns:context="http://www.springframework.org/schema/context" xmlns:aop="http://www.springframework.org/schema/aop" xmlns:tx="http://www.springframework.org/schema/tx" xmlns:xsi="http://www.w3.org/2001/XMLSchema-instance" xsi:schemaLocation=" http://www.springframework.org/schema/beans http://www.springframework.org/schema/beans/spring-beans.xsd http://www.springframework.org/schema/context http://www.springframework.org/schema/context/spring-context.xsd http://www.springframework.org/schema/aop http://www.springframework.org/schema/aop/spring-aop.xsd http://www.springframework.org/schema/tx http://www.springframework.org/schema/tx/spring-tx.xsd ">
<!-- 设置注解配置包扫描位置 --> <context:component-scan base-package="cn.zj.mybatis"/>
</beans> |
3.7. MyBatis 框架SqlSessionFactory对象的创建
* 问题: UserMapper 代理对象如何创建?
* 答 :使用 SqlSession 操作对象创建 !
*
* 问题 : SqlSession 对象如何创建?
*
* 答 : SqlSessionFactory 工厂对象创建?
*
* 问题: SqlSessionFactory 对象如何创建
*
* 1,和Spring框架集成之前
* MyBatis框架自己读取配置文件中的相关配置去创建
* 2, 和Spring框架集成之后
* 交个Spring容器来创建
* 问题: 如何在Spring框架中配置,创建出来SqlSessionFactory对象?
* mybatis和spring集成的类查阅 桥梁包
* org.mybatis.spring.SqlSessionFactoryBean 创建 SqlSessionFactory
*
*/
创建MyBatis框架工厂对象的 类在mybatis-spring1.2.1.jar 桥梁包中的
org.mybatis.spring.SqlSessionFactoryBean 类 如下图
|
|
3.7.1. 配置文件
| <?xml version="1.0" encoding="UTF-8"?> <beans xmlns="http://www.springframework.org/schema/beans" xmlns:p="http://www.springframework.org/schema/p" xmlns:context="http://www.springframework.org/schema/context" xmlns:aop="http://www.springframework.org/schema/aop" xmlns:tx="http://www.springframework.org/schema/tx" xmlns:xsi="http://www.w3.org/2001/XMLSchema-instance" xsi:schemaLocation=" http://www.springframework.org/schema/beans http://www.springframework.org/schema/beans/spring-beans.xsd http://www.springframework.org/schema/context http://www.springframework.org/schema/context/spring-context.xsd http://www.springframework.org/schema/aop http://www.springframework.org/schema/aop/spring-aop.xsd http://www.springframework.org/schema/tx http://www.springframework.org/schema/tx/spring-tx.xsd ">
<!-- 配置读取 db.properties 数据库配置文件 --> <context:property-placeholder location="classpath:db.properties"/>
<!-- 配置数据源连接池 --> <bean id="dataSource" class="com.alibaba.druid.pool.DruidDataSource" init-method="init" destroy-method="close"> <property name="driverClassName" value="${jdbc.driverClassName}"/> <property name="url" value="${jdbc.url}"/> <property name="username" value="${jdbc.username}"/> <property name="password" value="${jdbc.password}"/> <property name="maxActive" value="${jdbc.maxActive}"/> </bean>
<!-- 配置MyBatis框架的 SqlSessionFactoryBean 类,创建
SqlSessionFactory 工厂对象 --> <bean id="sqlSessionFactory" class="org.mybatis.spring.SqlSessionFactoryBean"> <!-- 1.注入数据源 --> <property name="dataSource" ref="dataSource"/>
<!-- 2.配置映射文件 --> <property name="mapperLocations"> <array> <!-- <value>classpath:cn/zj/mybatis/mapper/UserMapper.xml</value> --> <!-- 可以使用通配符 * 读取 目录下面所有的配置文件 --> <value>classpath:cn/zj/mybatis/mapper/*Mapper.xml</value> </array> </property>
<!-- 3. 配置别名使用包扫描 --> <property name="typeAliasesPackage" value="cn.zj.mybatis.pojo"/>
<!-- 4.读取mybat-config.xml配置文件,此配置文件可能还会配一些mybatis框架的 其他个性化配置 实际项目开发可能不用配置 --> <property name="configLocation" value="classpath:mybatis-config.xml"/> </bean> </beans> |
3.8. 创建MyBatis的Mapper接口的代理对象
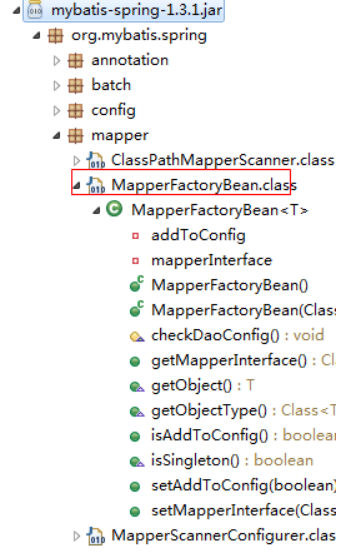
使用桥梁包 org.mybatis.spring.mapper.MapperFactoryBean<T> 创建 UserMapper代理对象
|
|
此种方式每一个Mapper接口需要单独配置,如果Mapper过多,创建Mapper可能造成配置代码过多
| <!-- 创建UserMapper代理对象-创建单个Mapper对象
使用桥梁包 org.mybatis.spring.mapper.MapperFactoryBean<T> 创建 UserMapper代理对象 -->
<bean id="userMapper" class="org.mybatis.spring.mapper.MapperFactoryBean">
<!-- 注入SqlSessionFacotry对象 --> <property name="sqlSessionFactory" ref="sqlSessionFactory"/>
<!-- 注入UserMapper接口类型:底层创建UserMapper的代理对象 --> <property name="mapperInterface" value="cn.zj.mybatis.mapper.UserMapper"/>
</bean> |
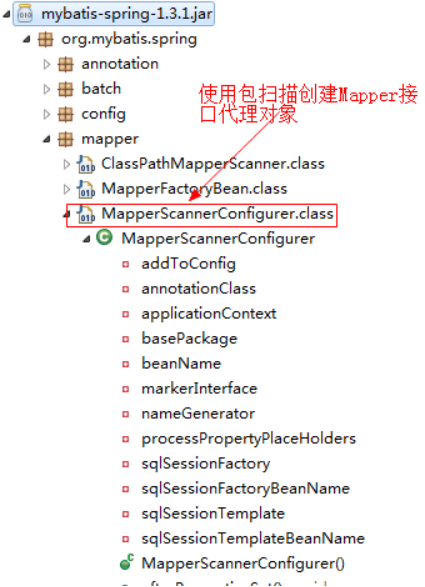
3.9. 使用包扫描创建MyBatis的Mapper接口的代理对象
|
|
| <!-- 批量创建Mapper代理对象 ,使用包扫描创建Mapper代理对象 使用桥梁包 org.mybatis.spring.mapper.MapperScannerConfigurer -->
<bean class="org.mybatis.spring.mapper.MapperScannerConfigurer"> <!-- 配置需要创建Mapper接口代理对象对应的包 --> <property name="basePackage" value="cn.zj.mybatis.mapper"/>
<!-- 配置SqlSessionFactoryBean 的名称,不是引用 --> <property name="sqlSessionFactoryBeanName" value="sqlSessionFactory"/> </bean> |
3.10. MyBatis的事务管理器的配置
一般开发,事务的管理都会使用aop切入到业务层
| <!-- 配置事务管理器 --> <bean id="transactionManager" class="org.springframework.jdbc.datasource.DataSourceTransactionManager"> <!-- 注入数据源 --> <property name="dataSource" ref="dataSource"/> </bean>
<!-- spring事务配置 --> <tx:advice id="txAdvice" transaction-manager="transactionManager">
<!-- 事务属性配置 --> <tx:attributes> <!-- DQL :查询操作,配置只读事务 --> <tx:method name="get*" read-only="true" isolation="REPEATABLE_READ" propagation="REQUIRED"/> <tx:method name="select*" read-only="true" isolation="REPEATABLE_READ" propagation="REQUIRED"/> <tx:method name="find*" read-only="true" isolation="REPEATABLE_READ" propagation="REQUIRED"/> <tx:method name="query*" read-only="true" isolation="REPEATABLE_READ" propagation="REQUIRED"/>
<!-- 其他 SQL :非只读事务 --> <tx:method name="*" read-only="false" isolation="REPEATABLE_READ" propagation="REQUIRED"/>
</tx:attributes>
</tx:advice>
<!-- 配置AOP 切入事务 -->
<aop:config> <!-- 切入点 --> <aop:pointcut expression="execution(* cn.zj.mybatis.service..*.*(..))" id="pt"/>
<!-- 切面 --> <aop:advisor advice-ref="txAdvice" pointcut-ref="pt"/> </aop:config>
|
4. SpringMVC的集成
4.1. 在在web.xml配置SpringMVC的前端控制器
| <?xml version="1.0" encoding="UTF-8"?> <web-app xmlns:xsi="http://www.w3.org/2001/XMLSchema-instance" xmlns="http://java.sun.com/xml/ns/javaee" xsi:schemaLocation="http://java.sun.com/xml/ns/javaee http://java.sun.com/xml/ns/javaee/web-app_3_0.xsd" version="3.0">
<!-- 配置字符编码过滤器 --> <filter> <filter-name>CharacterEncodingFilter</filter-name> <filter-class>org.springframework.web.filter.CharacterEncodingFilter</filter-class> <init-param> <param-name>encoding</param-name> <param-value>UTF-8</param-value> </init-param> </filter> <filter-mapping> <filter-name>CharacterEncodingFilter</filter-name> <url-pattern>/*</url-pattern> </filter-mapping>
<!-- 配置前端控制器 --> <servlet> <servlet-name>MVC</servlet-name> <servlet-class>org.springframework.web.servlet.DispatcherServlet</servlet-class> <init-param> <param-name>contextConfigLocation</param-name>
<!-- 读取配置文件 问题:有多个spring相关配置文件如何读取 如 :spring.xml 和springmvc.xml
解决方案: 方案一:直接使用 统配 * 可以读取多个有相同前缀的文件 <param-value>classpath:spring*.xml</param-value> 方案二:先读取一个配置文件 如果 spring.xml 再在spring.xml文件中使用<import>标签导入 springmvc.xml文件 <import resource="classpath:springmvc.xml"/> -->
<param-value>classpath:spring.xml</param-value> </init-param>
<load-on-startup>1</load-on-startup>
</servlet> <servlet-mapping> <servlet-name>MVC</servlet-name> <url-pattern>*.do</url-pattern> </servlet-mapping>
</web-app> |
4.1.1. springmvc.xml配置文件
| <?xml version="1.0" encoding="UTF-8"?> <beans xmlns="http://www.springframework.org/schema/beans" xmlns:p="http://www.springframework.org/schema/p" xmlns:mvc="http://www.springframework.org/schema/mvc" xmlns:xsi="http://www.w3.org/2001/XMLSchema-instance" xsi:schemaLocation=" http://www.springframework.org/schema/beans http://www.springframework.org/schema/beans/spring-beans.xsd http://www.springframework.org/schema/mvc http://www.springframework.org/schema/mvc/spring-mvc.xsd "> <!-- 配置springmvc的注解驱动 --> <mvc:annotation-driven/>
</beans> |
4.2. 编写控制器 UserController
| package cn.zj.ssm.controller;
import java.util.List;
import org.springframework.beans.factory.annotation.Autowired; import org.springframework.stereotype.Controller; import org.springframework.ui.Model; import org.springframework.web.bind.annotation.RequestMapping;
import cn.zj.ssm.pojo.User; import cn.zj.ssm.service.UserService;
@Controller @RequestMapping("/user") public class UserController {
@Autowired private UserService service;
@RequestMapping("/list") public String list(Model m) {
//调用service查询所有用户方法 List<User> users = service.selectList();
//共享数据 m.addAttribute("users", users);
return "/WEB-INF/view/user_list.jsp"; }
@RequestMapping("/delete") public String delete(Integer id) { System.out.println(id);
//调用service层的删除方法 service.delteByPrimaryKey(id);
return "redirect:/user/list.do"; }
}
|
4.3. user_list.jsp 页面
在jsp页面 使用jstl标签库需要先在页面引入jstl 标签库
| <%@ page language="java" contentType="text/html; charset=UTF-8" pageEncoding="UTF-8"%> <!-- 引入jstl标签库 --> <%@ taglib uri="http://java.sun.com/jsp/jstl/core" prefix="c"%> <!DOCTYPE html> <html> <head> <meta charset="UTF-8"> <title>Insert title here</title> </head> <body> <h3>用户列表</h3>
<table border="1" style="width: 500px;" cellspacing="0"> <tr> <th>id</th> <th>名称</th> <th>密码</th> <th>年龄</th> <th>操作</th> </tr>
<c:forEach items="${users}" var="user"> <tr> <td>${user.id}</td> <td>${user.name}</td> <td>${user.password}</td> <td>${user.age}</td> <td> <a href="javascript:void(0);" οnclick="deleteByPrimaryKey(${user.id})">删除</a> <a href="">修改</a> </td> </tr> </c:forEach> </table>
<script type="text/javascript">
function deleteByPrimaryKey(userId){
if(confirm("亲,您确定删除此条数据么?")){ window.location.href= "${pageContext.request.contextPath}/user/delete.do?id="+userId; } }
</script>
</body> </html> |
